

How To Install SPC Click Flooring
Want to install SPC click flooring yourself and save on labor costs? This complete step-by-step guide shows you exactly how to install SPC click lock flooring — from the tools you need and subfloor preparation to the final locking process. Whether you are a DIY beginner or an experienced installer, follow these instructions to achieve a professional, long-lasting result.
Table of Contents
Part 1: Preparations Before Installation
1. Material inspection and calculation
Calculation of usage:
Measure the area (in square meters) of the room where the floor needs to be laid. It is recommended to purchase an additional 5% to 10% as a spare for loss
Inspect the floor: Make sure all the locks are undamaged, and the color and texture are consistent to avoid obvious color differences after laying.
2. Prepare the tools
| Basic tools | Professional tools (optional) |
| Tape measure, pencil, right square | Electric cutting machine (higher efficiency) |
| Utility knife (for cutting with a steel ruler) | Pull rod (for the installation of the last row) |
| Rubber hammer, striking block (protective lock) | Angle measuring instrument (for use in complex cutting) |
3. Ground treatment requirements
Flatness inspection: A 2-meter straightedge can be used to check the ground, with a height difference of no more than 3mm/㎡. If it is uneven, it can be repaired with self-leveling cement or local leveling mortar.
Clean the floor: Remove dust, oil stains and debris to ensure no sharp objects remain.
4. Environmental adaptation
SPC flooring should be unpacked and left to stand for 48 hours before installation to adapt to the indoor temperature and humidity (it is recommended that the temperature be between 15℃ and 30℃). In relatively humid areas (such as the first floor), it is recommended to lay moisture-proof film first, overlap the joints by 10cm and seal them with tape.
Part 2: Detailed Installation Steps
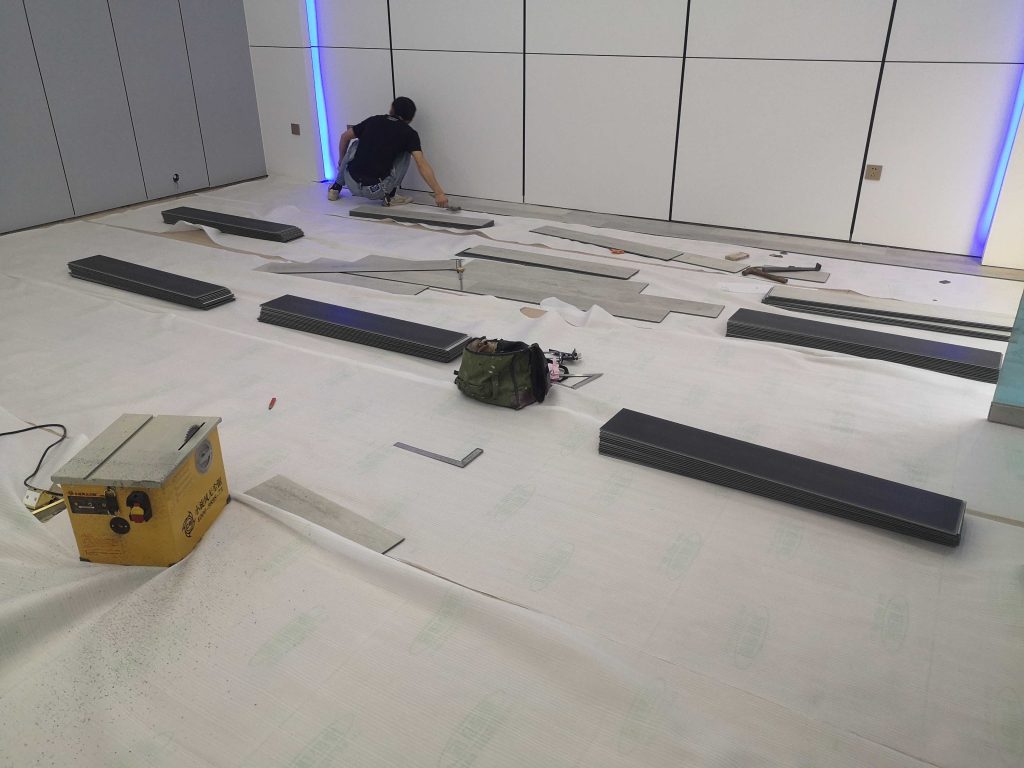
1.Lay moisture-proof cotton (if necessary)
If the ground is relatively damp (such as in the basement or on the first floor), you can first lay a 2mm moisture-proof pad to enhance the moisture-proof effect. If it is used for floor heating, the first floor and the floor of large shopping malls, etc., a 0.6-millimeter-thick film (greenhouse film) should be laid under the ground film. The seams of every two films should overlap by 200 millimeters and be sealed tightly with rubber strips. About 2 centimeters of extra space should be left around and folded against the wall.
2. Determine the laying direction
Recommended direction:
Laying along the light (with the long side of the floor perpendicular to the window) makes the visual effect neater. For small Spaces, it can be laid along the long side to make the room appear more spacious.
3. Installation of the first row of floors
Starting plate treatment: Measure the length of the wall to ensure that the last piece is ≥30cm (to avoid short fragments affecting stability), and start installing from the side close to the door or the corner of the room.
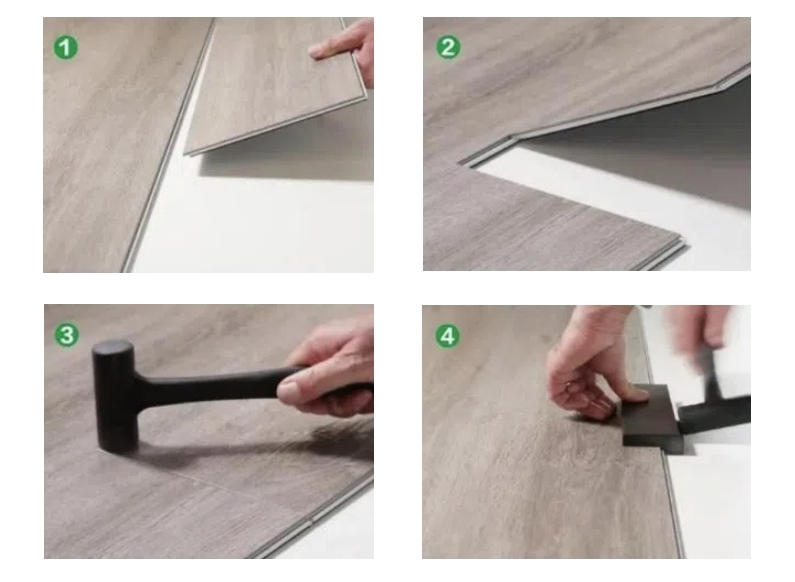
Lock alignment: Insert the short-side lock at an Angle into the adjacent floor, flatten it, and then gently tap it with a rubber hammer to lock it in place.
Reserve expansion joints: Insert 8-10mm spacers between the wall and the floor (cover them with skirting boards later).
4. Subsequent installation and staggered splicing
Staggered joint principle: The length of each starting board is recommended to be ≥30cm, and it should be staggered by 1/3 of the board length from the previous row (similar to a brick wall structure to enhance stability).
Lock installation tip: Insert the long side at a 30° Angle into the upper row, press it down flat and then gently tap to fix it. Check with a ruler every 3 to 4 rows to ensure they are flat to avoid cumulative errors.
5. Handle obstacles (door frames, pipes)
Door frame cutting: Turn the floor upside down under the door frame, outline it with a pencil and then cut it precisely.
Pipe opening: Measure the diameter of the pipe, draw a circle on the floor and cut it, and reserve a 5mm expansion joint around it.
6. Installation of the last line
Measurement and cutting: Actual width = Wall distance – Expansion joint (8-10mm).
Fix with a pull rod: Tilt the floor and insert it into the front row. Use a pull rod and a rubber hammer to tap it tightly to ensure that the lock is fully closed.
Part 3: Finishing Work After Installation
1.Install the skirting board
Recommended type: PVC skirting board (economical and waterproof) or solid wood skirting board (high-end and beautiful).
Fixed method: Nail-free glue (not damaging the wall) or nail fixation (more secure).
2. Cleaning and maintenance
Initial cleaning: Clean the surface with a slightly damp mop to avoid leaving a large amount of water stains.
Daily maintenance: Avoid acidic cleaners and recommend neutral floor cleaning liquid.
3. Suggestions for furniture placement
Heavy furniture: Install furniture protective pads to prevent direct dragging and scratching of the floor.
Expansion joint protection: Do not press the edges with heavy objects to avoid affecting the floor’s expansion and contraction.
Summary
It’s not difficult to install SPC Click flooring by yourself. As long as you do a good job in ground treatment, correctly assemble the locks and reserve expansion joints, you can easily complete it! If your room layout is complex, you can refer to the installation video provided by the manufacturer or consult a professional.