

SPC Flooring Expansion Gap Guide: How Much Space Do You Really Need?
Gaps between SPC floor planks are one of the most common complaints homeowners raise after installing new flooring—and they can be frustrating. A floor that looked perfect on day one can develop visible seams within weeks, and those gaps trap dust and moisture while hastening plank movement over time. The good news: most gapping is preventable. The single most commonly skipped step is leaving a proper expansion gap, but expansion gaps are not the only cause of seams opening up.
If you are installing SPC in a sunroom or other high-heat environment, see our dedicated sunroom guide. If your floor is already separating and you need a diagnosis, see our SPC flooring separation troubleshooting guide.
Table of Contents
Why Do SPC Floor Planks Develop Gaps?
Gaps rarely come from a single mistake. In most cases, one or more of the following five factors is at work.
Missing or incorrect expansion gaps. A floating SPC floor moves as one continuous sheet; without perimeter room to expand, movement goes upward and can break joints elsewhere in the room. Incorrect gaps include no gap, too small a gap, a gap blocked by debris, or a floor pinned by baseboards nailed through the planks. This is the leading cause and is covered in depth in Parts 2–5.
Improper acclimatization. Planks installed before adjusting to room conditions can move later. Most manufacturers recommend 24–48 hours in the installation room before laying.
Uneven or unclean subfloor. Dust, debris, dips, or high spots prevent click-lock joints from seating firmly; stress shows up as gaps months later.
Incomplete click-lock engagement. A rushed row or wrong insertion angle leaves planks loose under foot traffic and temperature swings.
Temperature and humidity fluctuations after installation. Direct sunlight, underfloor heating, and rooms without climate control put extra strain on joints over time.Of these, expansion gaps are the most controllable and most frequently overlooked—so the next four parts focus on them.
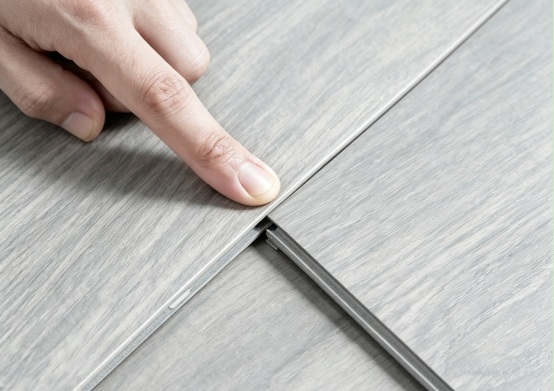
Among these five causes, expansion gaps are easiest to control yet most often ignored. The following sections will cover this topic in detail.
What Is an Expansion Gap and Why Does SPC Flooring Need One?
An expansion gap is a small, intentional space left between the edge of your flooring and any fixed vertical surface — walls, cabinets, door frames, columns, and more. Its job is simple: give your floor room to breathe.
SPC (Stone Plastic Composite) flooring is made from a rigid core of limestone powder, PVC, and stabilizers. Compared to hardwood or even standard LVP, SPC is remarkably stable — it won’t swell dramatically with moisture changes. But “more stable” doesn’t mean “immune to movement.”
As the temperature increases or decreases indoors, the SPC flooring will experience expansion and contraction – although minimally. Being a floating floor (i.e., the planks click without being nailed or glued onto the floor), the movement of the whole floor is as one. With no space for expansion sideways, there is nowhere else for the movement to occur except upward.
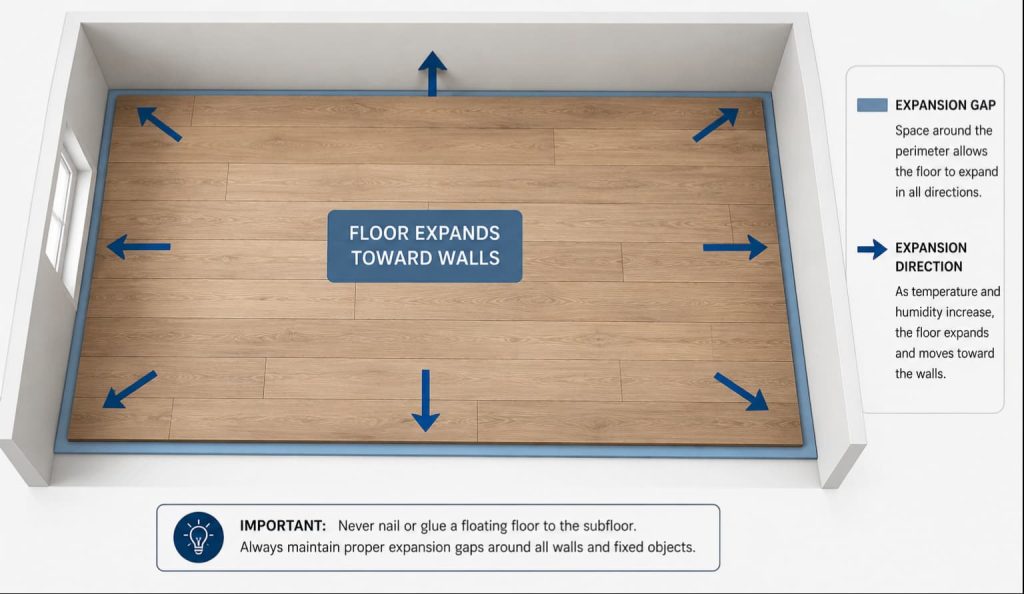
The result? Buckling, peaking, and damaged planks — all of which are expensive to fix and entirely preventable.
How Much Gap for SPC Flooring? (The Right Measurements)
The general requirement is ¼ inch (about 6 mm) around each side, measured from any permanent vertical surface. In larger areas this may not be enough: for every 30 feet of floor width, add another ⅛ inch. If the floor width exceeds 30 feet, use ⅜ inch (10 mm) to as much as ½ inch.
Use the table below as a quick reference:
| Installation Scenario | Recommended Gap |
| Standard room (under 30 ft) | ¼ inch (6 mm) |
| Large room or open plan (over 30 ft) | ⅜ inch (10 mm) |
| Around doorframes and casings | ¼ – ½ inch |
| Around columns, islands, or fixed cabinetry | ¼ inch on all sides |
| Transition strip connections | ¼ inch minimum |
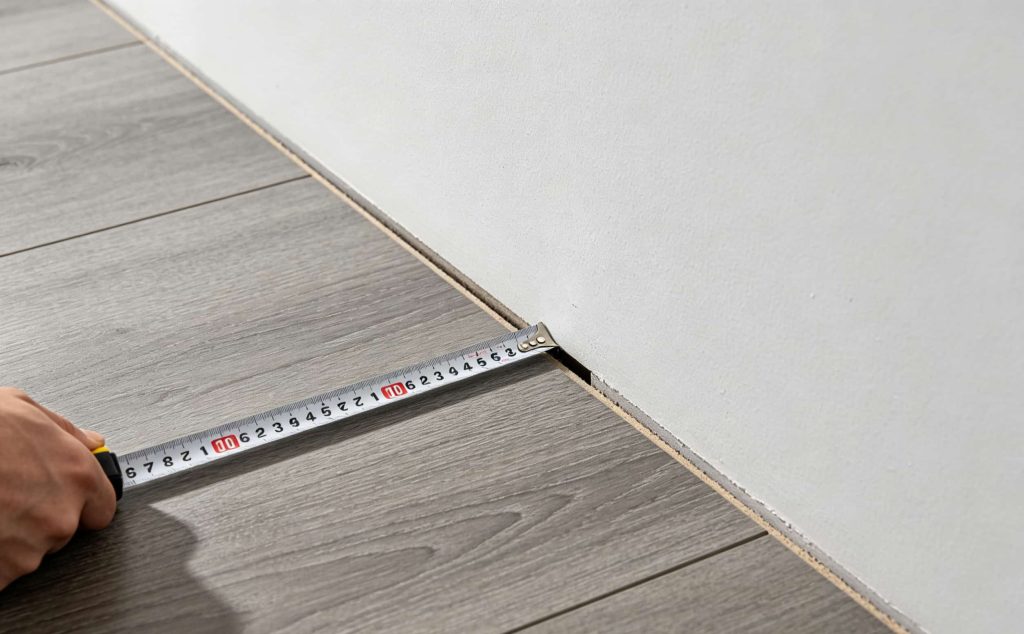
When in doubt, err on the side of slightly more gap: a larger gap is easy to hide with trim, while a gap that is too small can cause structural damage. Some manufacturers quote 8–10 mm as a conservative range; always confirm the exact figure in your product’s manual, since click systems vary between brands.
Where Do You Need to Leave an Expansion Gap?
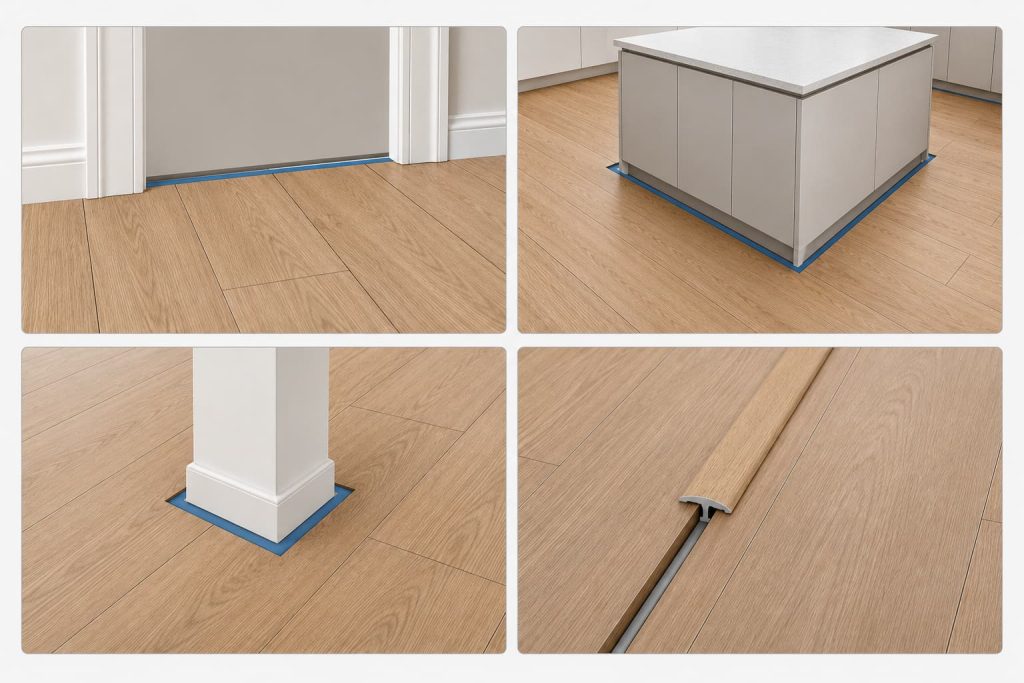
Most people remember to leave a gap along the main walls — but expansion gaps are required at every fixed vertical surface the floor runs up against. Here’s a complete checklist:
- Along all perimeter walls. This is the most obvious location. Run your spacers consistently along every wall as you install.
- At doorframes and door casings. This is the most commonly overlooked spot. Trim the bottom of door casings so the flooring slides underneath with the correct gap, rather than butting up hard against the casing wood.
- Around kitchen islands and fixed cabinetry. If your floor runs under or around an island or built-in cabinet, leave a gap all the way around. These structures are anchored to the subfloor and don’t move with the floor.
- Around support columns and pillars. Circle the entire column with a consistent gap.
- At fireplace hearths and raised platforms. Any fixed raised surface counts.
- At transition strips between rooms. The T-molding or reducer strip itself accommodates some movement, but the flooring still needs a gap on each side before reaching the strip.
- Heating vents and floor registers. A tight fit around a fixed register frame creates another anchor point; leave a small gap and use a cover plate.
What Happens If You Don’t Leave an Expansion Gap? (SPC Flooring Buckling)
A floor that expands and rises because it lacks space to expand is experiencing buckling. Because it cannot move sideways and is pushing against walls, the material raises itself upward.
What buckling looks like: raised ridges in the middle of the room, plank edges lifting or separating, clicking or creaking underfoot, and gaps opening between planks in cooler conditions.
Why it happens: no gap at all; a gap too small for the room size or season; a gap blocked by installation dust or subfloor debris; or transition strips and baseboards nailed through the flooring, pinning it in place.
Most gaps that appear after installation do not mean the flooring is defective—they typically point back to an installation or environmental issue that can be addressed.
How to Prevent Gaps During Installation (Step-by-Step)
1. Acclimate the planks before installation. Leave cartons unopened in the room for 24–48 hours so the material reaches a stable temperature before it’s cut and locked into place.
2. Prepare a clean, level subfloor. Sweep away debris and check for lumps or dips that aren’t visible at a glance — these are among the most overlooked causes of long-term gapping.
3. Leave the correct expansion gap around the perimeter. Industry guidance for floating SPC floors generally calls for a perimeter gap of roughly 8–10mm along walls and at fixed obstacles such as door frames and cabinets, with wider rooms needing more allowance.
4. Spacers are a good way to ensure regular spacing. The uniform spacers between the top row as well as the walls help keep the gaps even and keep the floor from getting closer as you move across the space.
5. Engage the click-lock system fully. Place the long-side tongue in the groove at 30 degrees. Press down until you can hear the first click, then move the short side into the groove until both sides align completely.
6. Tap joints gently with a rubber mallet and tapping block. A soft rubber hammer used against a plastic tapping block finishes the lock without damaging the plank edge — hammering directly on the plank is one of the most common ways installers unintentionally chip or crack the surface.
7. Inspect each row before moving to the next. Press along each joint by hand to confirm there’s no looseness or lifting before continuing. Catching a loose joint early is far easier than correcting it after the whole floor is down.
What If Gaps or Buckling Still Appear After Installation?
Minor gaps or a locally disengaged joint. Re-engage the affected joint, adjust the perimeter gap if it was not tight, or lift and re-lay one small piece if a lock was not fully seated. Full replacement is rarely necessary.
Early-stage buckling with uncracked planks. Remove the baseboard or transition strip, pull back the rows near the problem area, re-trim the edges to create proper gap clearance, and re-install.
Damaged planks or large-scale buckling. Replace the affected planks. If the subfloor or gap planning is fundamentally at fault, partial or full re-laying may be required.
Common Expansion Gap Mistakes to Avoid
Even experienced installers make these errors. Watch out for all of them:
Forgetting the gap at doorframes. It’s easy to focus on the main walls and forget that door casings are vertical surfaces too. Always undercut door casings before laying the floor.
Nailing baseboards through the floor. Baseboards should be nailed into the wall studs only — never into the flooring. The floor needs to float freely beneath the trim. If you nail through the floor, you’ve just anchored it in place.
Filling the gap with caulk or sealant. Some people look at the expansion gap and think it’s a draft problem or an aesthetic issue. Filling it with caulk eliminates the gap entirely and defeats its purpose. The floor will push against the hardened caulk just as it would against a wall.
Not adding a T-molding in long runs. In rooms or hallways longer than 40 feet, the cumulative expansion of the floor can exceed what the perimeter gaps alone can absorb. A T-molding transition strip in the middle of a long run gives the floor a relief point and prevents buckling from building up over distance.
Ignoring heating vents and floor registers. If you install flooring tight around a fixed floor register frame, you’ve created another anchor point. Leave a small gap and use an appropriate cover plate.
Choosing SPC Flooring That Is Less Prone to Gapping
Installation technique matters most, but the plank itself plays a real role. Dimensional consistency in manufacturing, a stable stone-powder core with low thermal deformation, and a well-engineered locking profile all reduce the odds of gaps forming—even under less-than-ideal room conditions. When comparing SPC products, ask about core composition and locking-system tolerances, not just surface finish. For a fuller checklist on thickness, core density, and certification, see our SPC flooring separation guide.
Does SPC Flooring Need Expansion Gaps More or Less Than Other Flooring?
SPC is actually one of the more forgiving flooring types when it comes to expansion — but it still needs a gap. Here’s a quick comparison:
SPC vs. solid hardwood. Solid hardwood is highly sensitive to moisture and temperature, and can expand dramatically across its width. Hardwood installations typically require ½ inch or more of expansion gap. SPC needs far less — ¼ inch is usually sufficient.
SPC vs. LVP (Luxury Vinyl Plank). Standard LVP is more flexible than SPC and can be more reactive to heat. SPC’s rigid core makes it more dimensionally stable, but both products require the same general approach: leave a perimeter gap and don’t anchor the floor.
SPC vs. ceramic tile. Tile is mortar-set and behaves completely differently — it doesn’t float, so expansion gaps aren’t required in the same way. However, grout joints serve a related function by accommodating minor movement.
The takeaway: SPC is more forgiving than hardwood or standard vinyl, but it is still a floating floor and still needs room to move. Don’t skip the gap just because SPC is marketed as “ultra-stable.”
How to Hide the Expansion Gap (Without Compromising Performance)
The expansion gap is a functional necessity, but nobody wants to see a ¼-inch trench running around the perimeter of their living room. Fortunately, hiding it is straightforward — as long as you don’t accidentally seal it in the process.
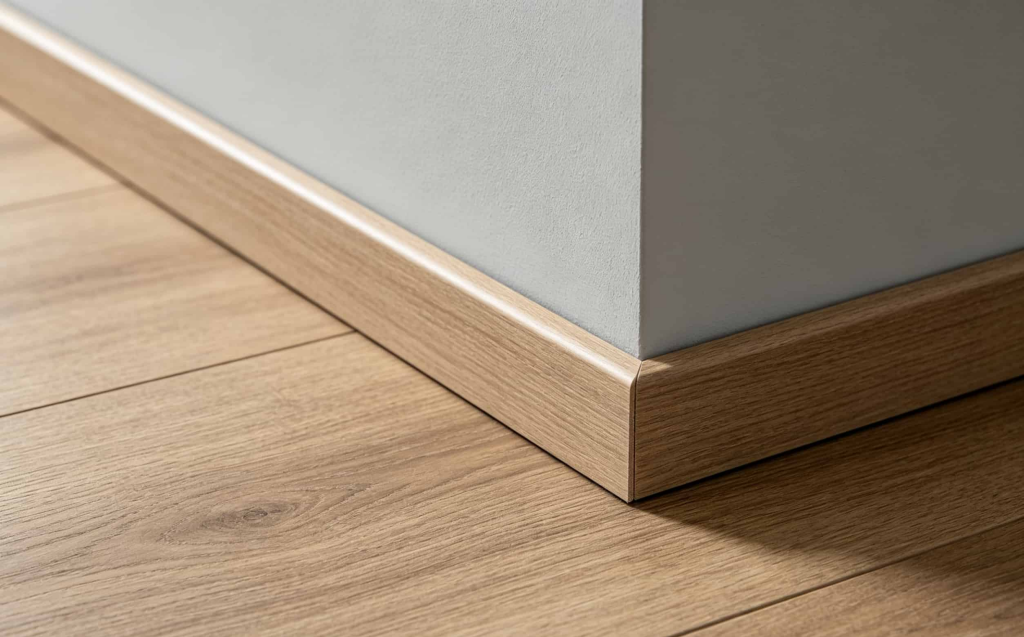
Baseboards and base molding. The most common solution. Install your baseboards after the floor is laid, nailing them into the wall (not the floor). The baseboard overhangs the gap and conceals it completely. Make sure the baseboard sits on top of the floor without pressing down on it — there should be a small amount of clearance.
Quarter round and shoe molding. If your baseboards don’t extend low enough to cover the gap, a thin strip of quarter round nailed to the baseboard (again, not the floor) fills in the space neatly.
T-molding and reducer strips. At doorways and transitions between rooms, T-molding covers the gap between two floor surfaces. Reducers are used where SPC meets a lower surface like tile or carpet.
What NOT to use. Never fill the expansion gap with caulk, grout, foam backer rod (when packed tightly), or any other rigid or semi-rigid filler. These materials will prevent the floor from moving and transfer expansion forces directly to your planks.
Frequently Asked Questions
summary
The expansion gap is one of the smallest details in a flooring installation — and one of the most important. A ¼-inch gap around the perimeter of your room is all that stands between a beautiful, long-lasting floor and an expensive buckling repair job.
To recap the key rules:
- Leave a minimum ¼ inch (6mm) gap around all fixed vertical surfaces
- Increase to ⅜ inch or more in rooms larger than 30 feet
- Remember doorframes, columns, islands, and cabinets — not just walls
- Never nail baseboards through the floor
- Never fill the gap with caulk or sealant
- Use baseboard trim and quarter round to cover the gap without sealing it
Get the expansion gap right during installation, and your SPC floor will perform exactly as designed — stable, beautiful, and built to last.